
Managing loans in QuickBooks Online involves accurately recording payments to reflect both principal and interest components.
Previously, I showed you how to add an equipment loan to QuickBooks Online.
This guide provides step-by-step instructions to help you efficiently record your loan payments, ensuring your financial records remain precise and up-to-date.
Quick Instructions:
Note: Only use ONE of these methods for a payment! Whichever one works best for you.
Check payment:
- In the upper left corner click +New
- Under VENDORS select Check
- Fill in the following:
- Payee: the bank you have your loan with
- Bank Account: the checking account the money is coming out of
- Payment date: date the payment was made
- Check no.: The check number or “ACH” if using an ACH payment
- Enter a line for your loan payment where CATEGORY is your loan and AMOUNT is how much was paid towards the principle
- Enter a line for your loan payment where CATEGORY is “Interest Expense” and AMOUNT is how much was paid towards the interest
- Click Save and Close
Adding a payment to the Bank Register:
- Click Accounting in the left-hand menu
- Select Chart of accounts
- Find your loan in the list of accounts
- Click View register on the right
- Click Add journal entry and add an entry for the interest:
- PAYEE: The bank you have your loan with
- ACCOUNT: Interest Expense
- INCREASE: Your interest amount
- Click Add journal entry and add an entry for the loan payment:
- PAYEE: The bank you have your loan with
- ACCOUNT: Checking account used to pay the loan
- DECREASE: Your check amount
Only use ONE of these methods for a payment! Whichever one works best for you.
Keep reading for full instructions with screenshots.
Recording a Loan Payment Using a Check
In this example, you’ll learn how to add a loan payment using a check.
Navigate to the +New button located in the upper-left corner.
Under the VENDORS section, select Check.

Enter payment details:
- Payee: Input the name of the bank or financial institution that issued the loan.
- Bank Account: Choose the checking account from which the payment will be made.
- Payment Date: Specify the date the payment was executed.
- Check Number: Enter the check number used for the payment. If the payment was made electronically, such as through ACH, input “ACH” instead.
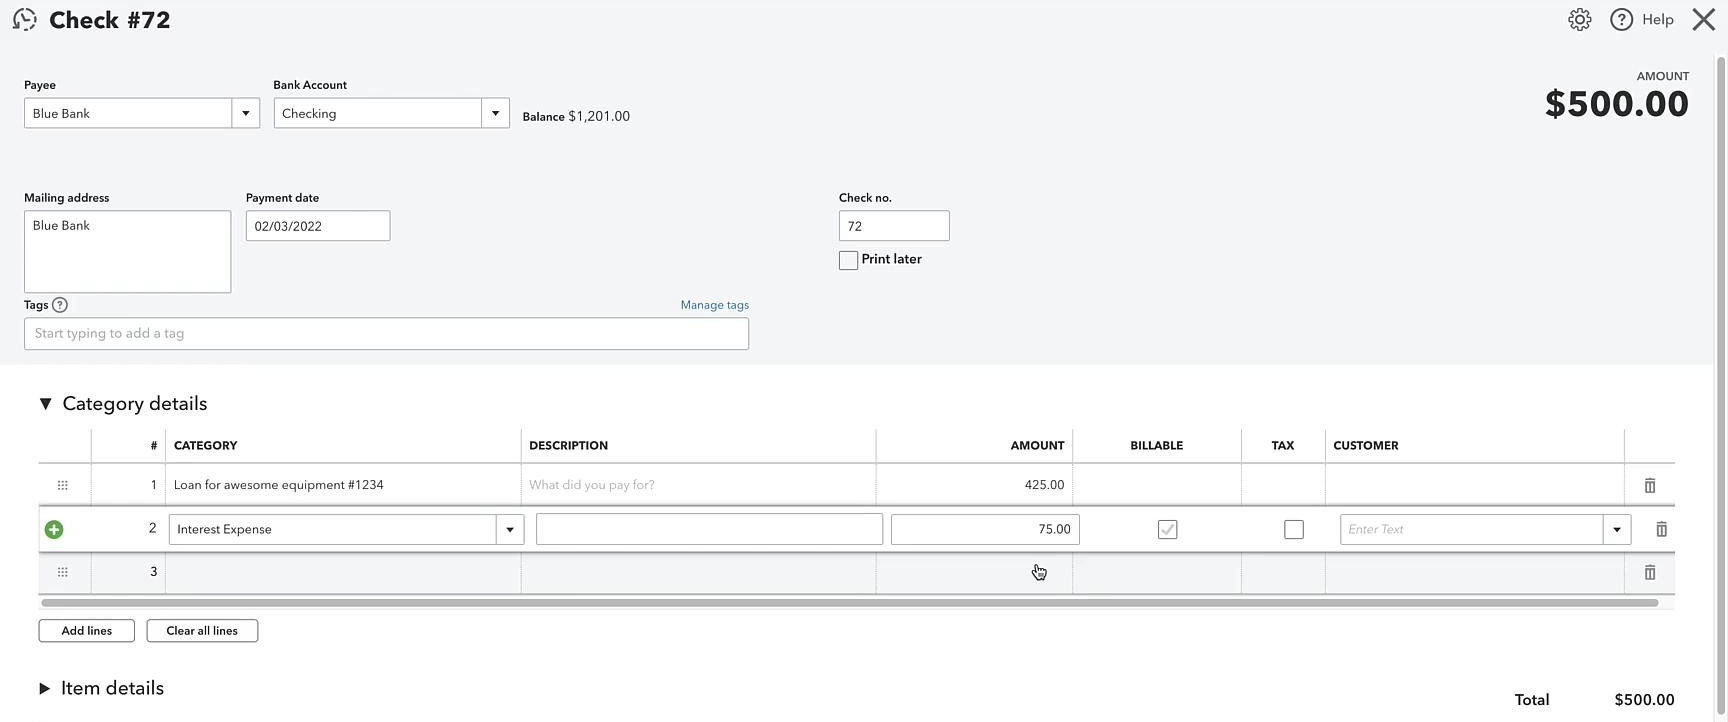
In Category Details, you’re telling QuickBooks why you’re giving your bank this money. In this case, it’s a loan which will be split into principal and interest.
- Principal Payment:
- Category: Select the liability account associated with the loan.
- Amount: Enter the portion of the payment that reduces the loan principal.
- Interest Payment:
- Category: Choose the Interest Expense account.
- Amount: Input the interest portion of the payment.
In my example, I’m making a payment of $500.
- $425 for the loan
- $75 for the interest
Here’s what it looks like in QuickBooks:
After entering all necessary details, click Save and Close to record the payment.
Note: Ensure that the principal and interest amounts align with your loan amortization schedule or the details provided by your lender.
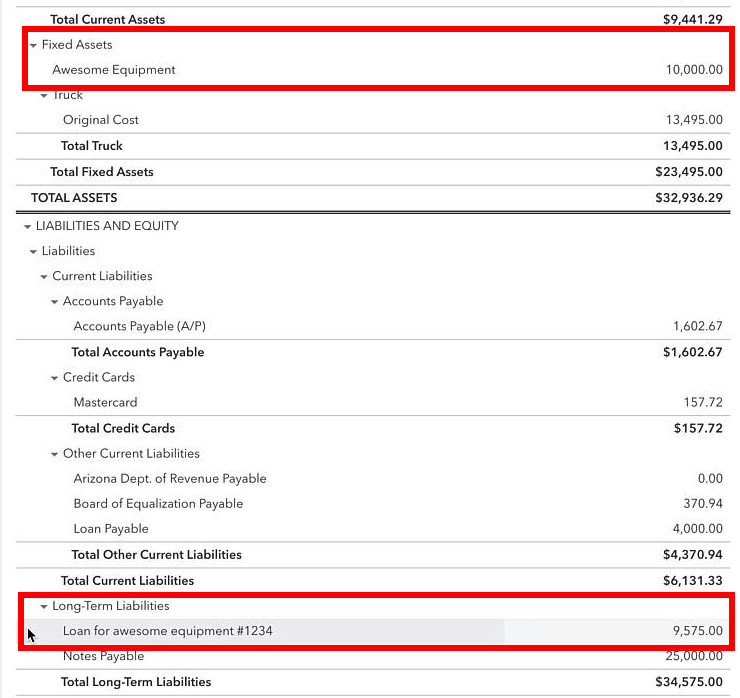
Viewing a Loan Payment on the Balance Sheet
After making a loan payment, you’ll notice that the fixed asset amount is the same on your balance sheet.
While the Long-Term Liability loan has decreased by the amount paid.
Recording a Loan Payment via the Bank Register
Another way to add a payment to your loan would be as journal entries on the register.
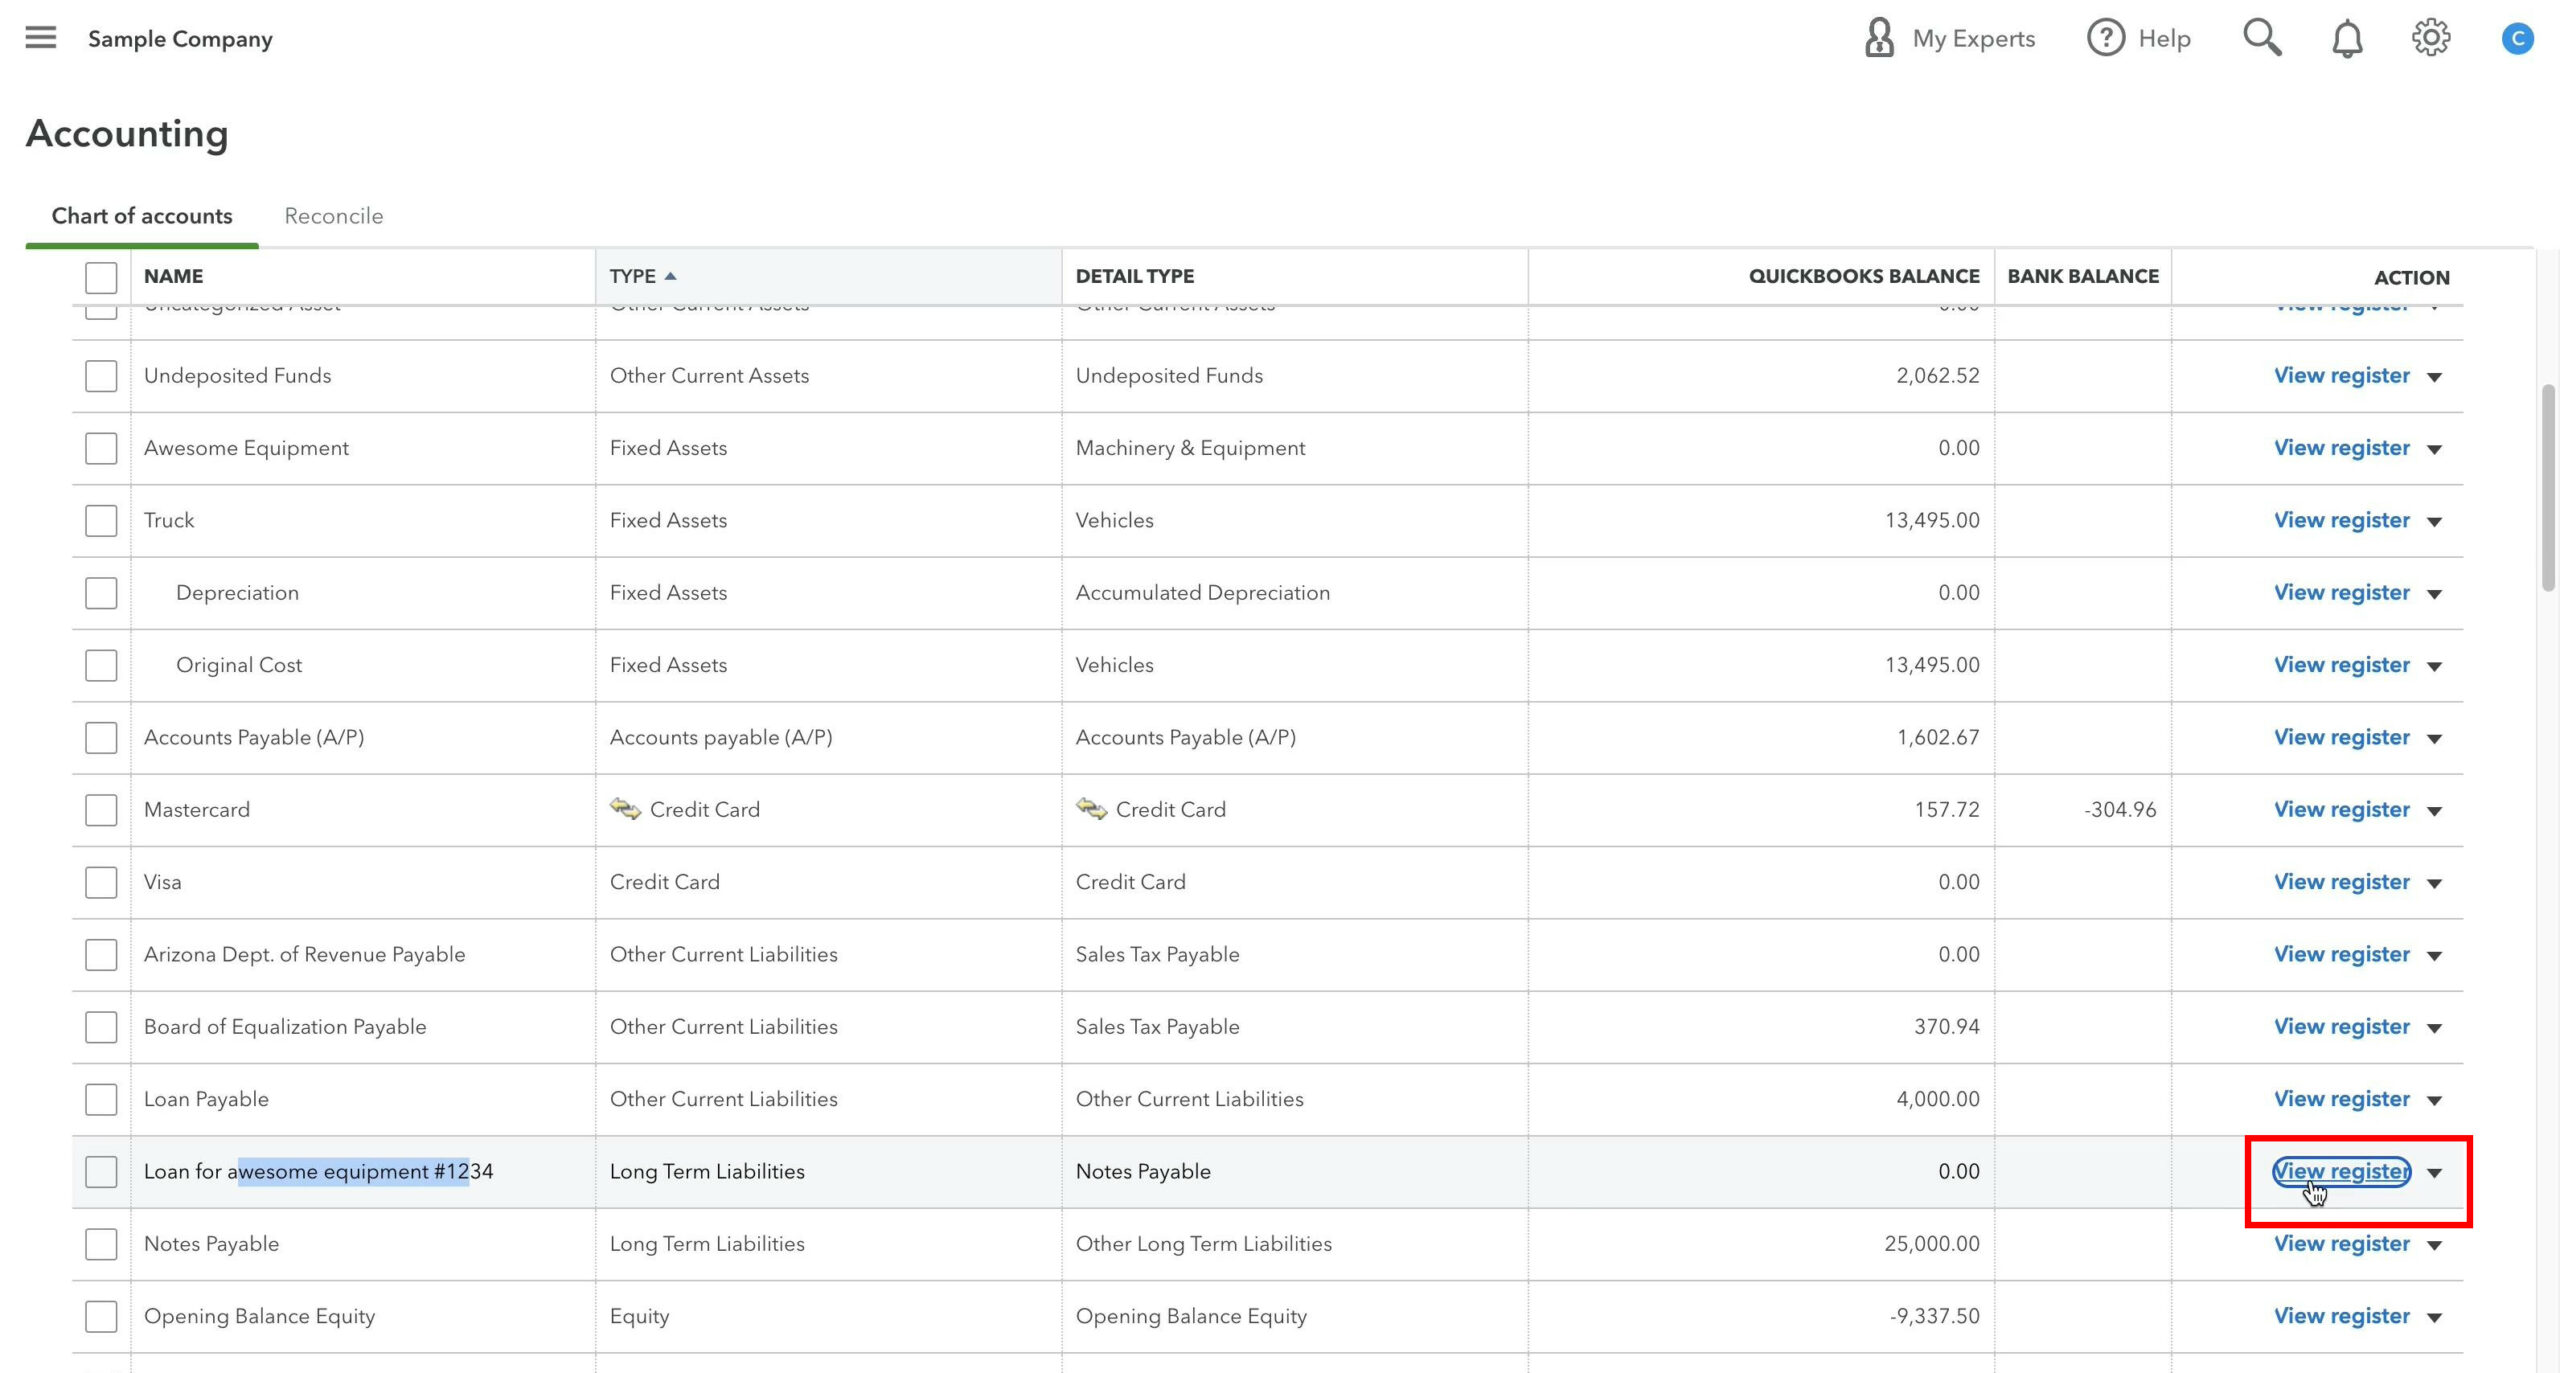
From the left-hand menu, select Accounting, then click on Chart of Accounts.
Find your loan in the list of accounts and click View register to the right.
Click Add journal entry and add the following details for the interest payment:
- PAYEE: The bank or financial institution.
- ACCOUNT: Select the Interest Expense account.
- INCREASE: Input the interest amount paid.
Click Add journal entry again and add the following details for the principal payment:
- PAYEE: The bank or financial institution.
- ACCOUNT: Choose the checking account from which the payment was made.
- DECREASE: Enter the principal payment amount.
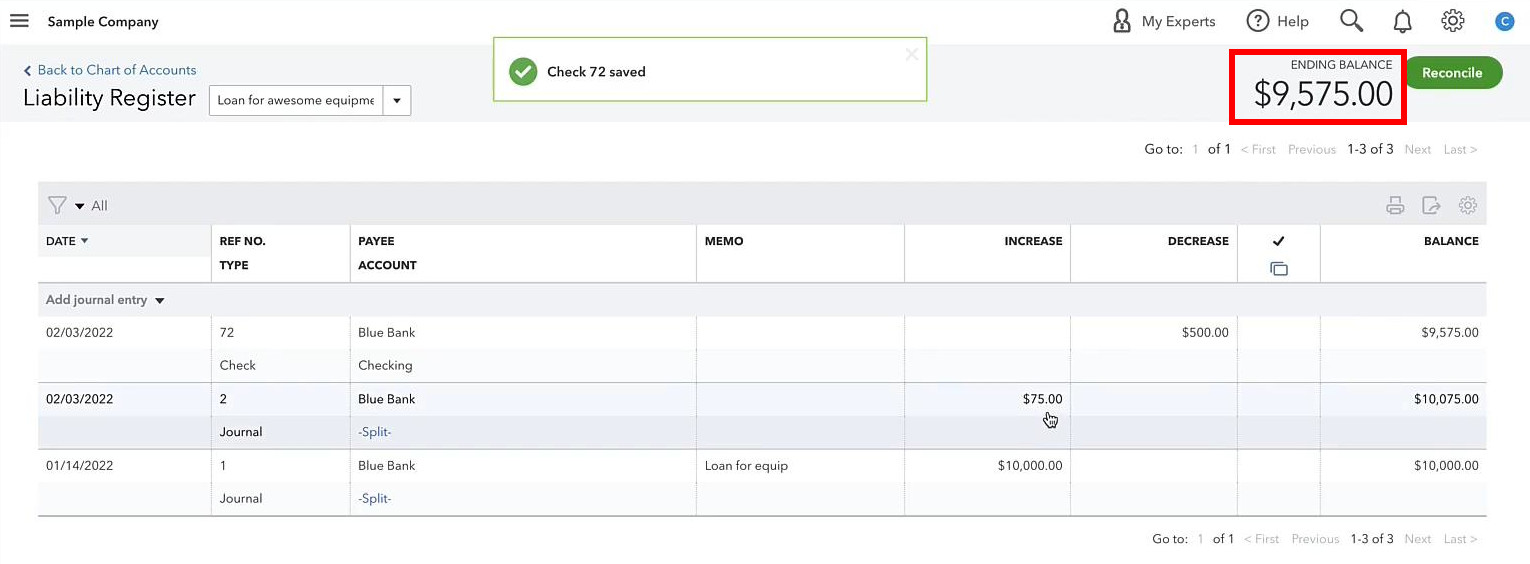
In this method, you’re telling QuickBooks that your loan was increased by an interest expense and decreased by a check payment.
Either method will decrease the ending balance for your loan by the same amount.
In my example, both methods decreased my loan amount by $425.
Important Considerations
- Consistency: Use only one of the methods above to record each payment to avoid duplication.
- Accuracy: Regularly reconcile your loan statements with your QuickBooks records to ensure all entries are accurate.
- Documentation: Maintain detailed records of all loan-related documents, including payment schedules and correspondence with lenders.
☕ If you found this helpful, you can say “thanks” by buying me a coffee…
https://www.buymeacoffee.com/gentlefrog
If you have any questions about recording loan payments in QuickBooks, click the green button below to schedule a free consultation.
For a visual demonstration of recording loan payments in QuickBooks Online, you may find the following video tutorial helpful:


2 Responses
This was so extremely helpful! Saved me so much time while having a good understanding of how it works!
This saved me a ton of time. Thank you!