In this tutorial, I’ll show you how you can customize the icon bar in QuickBooks Desktop. This can make working in QuickBooks much faster and easier.
You’ll learn how to:
- Delete Icons from the icon bar
- Add Icons to the icon bar
- Add Custom Reports to the icon bar
I’ll be using QuickBooks Desktop 2020 Premier Edition. This should work with either Pro or Premier.
If you’ve never customized your icon bar it’s probably on the left-hand side and looks something like this:
If you’d prefer, you can move the icons to the top of the screen. To do this click View in the top menu and then select Top Icon Bar.
The icons now appear across the top of the screen.
These icons represent different actions you can take and different reports you can generate within QuickBooks.
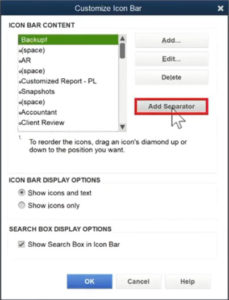
If you find yourself not using some of these icons you can edit this icon bar. To do so right click on the icon bar, a “Customize Icon Bar…” message will appear.
Click on that message to open the Customize Icon Bar window.
From this window you can select which icons you’d like to keep and which ones you’d like to remove.
Delete Icons from the Icon Bar
To remove an icon select it from the list and click Delete.
As you delete icons from the list in the window you’ll see them disappear from the icon bar.
Add Icons to the Icon Bar
If you’d like to add icons to your Icon Bar click the Add button and the Add Icon Bar Item window will appear.
In this window you’ll see a selection of options that you can add to your icon bar.
You also get the option to customize your selection. You can choose the icon you’d like to use as well as give it your own label and description.
In the image below I’m adding “Back Up Data” to my icon bar with the label “Backup!” and using the Disk icon.
I click the blue OK button and Backup! is added to my icon bar on the far right.
I’d like to move this icon to the far left.
In the Customize Icon Bar window I click the little arrow to the left of Backup! and drag it to the top of the list.
Backup! Is now located on the far left of the icon bar.
You can add space between your icons by click the Add Separator button.
Adding Custom Reports to the Icon Bar
It’s possible to add items to the icon bar that aren’t in the existing list. This might be a custom report you’ve created.
You’ll first need to navigate to the report you’d like to add. To do this from the main menu you’ll click Reports -> Memorized Reports and then select the report you’d like.
To add the report to the icon bar in the main menu click View. About halfway down the menu you’ll see “Add “Your Report Name” to the icon Bar..”
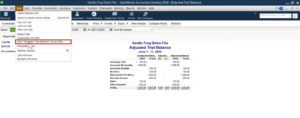 A new Add Window to Icon Bar window will open.
From here you can add a custom label, description and pick an icon for the report.
When you click the OK button an icon linking to the report will appear in your icon bar.
When you take the time to customize your icon bar and you’ll no longer have to search around for the actions and reports you use most often. You’ll save yourself time in the long run.
☕ If you found this helpful you can say “thanks” by buying me a coffee…
https://www.buymeacoffee.com/gentlefrog
If you’d like to watch me walk through this icon bar customization process you can watch the video below:







2 Responses
How to add a particular account from chart of accounts to top icon bar?
Hi Hersh,
I found these instructions on another blog site: Add multiple check registers to icon shortcut bar. Hopefully, this is what you’re looking for.
-Jess